This year we went to the “Hands on the Arts” festival and craft fair in Eastham, Ma, for the second year in a row. Last year the kid’s had so much fun and I couldn’t wait to take them back!
If you didn’t catch my post last year about this fair you can find it HERE.
The brief run down of this event is that it is all FREE! Well, the kids activities are anyways! They had a puppet show for the Littles, and a big tent set up with many tables so the kids could do all kinds of free crafts. Then of course there are awesome craft vendors to peek through! (****remember to support your local crafters!! They work sooooo hard!!!), and a few food vendors—did I mention the mouthwatering BBQ?? YUMMERS!
Anyhoo, enough with the words, this is what our day looked like:
Peter and the wolf puppet show. Thie kids LOVED this!Sorting seashells for the mosaic project…
I have to say here that my youngest, Shelby, was too small last year to really participate in the activities, besides putting her handprint in some clay. So this year she was very excited to not have to sit in the stroller. She had so much fun beading her own necklaces and choosing the beads. As you can see she is very proud of her work here!
Painting seashells, rocks, and starfish. You can never go wrong with toddlers and a bucket of paint. They love it!
My oldest daughter, Hannah was very interested in the pottery wheel. Here the woman is teaching the kids how to use it. This was not a take-home project because many kids would assist with one item, but it was still a great hands-on activity for the kids to learn from.
You can’t see Hannah’s project too well, but she made a girl out of clay. Very inventive.
I was finally able to snap a pic of what Spencer was up to! He loves to mess with tape, glue, cardboard, paper towel rolls, and anything random!
Each of the kids had an absolute blast. It was a day to be creative without restrictions. They had many choices of mediums to use, and nice works of art to take home.
And then we discovered that I locked my keys in my car. ://////// OOPS! Here are the Littles sitting in a shady spot while we waited for the AAA person to come pop open my door—–
*sigh, it never ends does it? 🙂
At least we had a good day anyway!
As Always — Don’t forget to visit me on ETSY, and LIKE my page on Facebook to keep up with all the goodies!!!! Remember to support your local crafters!
I came across this really interesting sun-catcher on . I love this site! I love sharing on it and I love to find nifty little creations that I can do at home myself. As you all I know I love to craft anything I can get my hands on. My first day on Pinterest I thought I was losing my eyesight, I was soooooo addicted to pinning that my eyes were burning. I think I woke up with a Pinterest hangover. If you haven’t tried Pinterest, then I suggest you check it out!
So anyhoo, back to my crafting experience. I found this awesome picture:
I thought, wow, so pretty! It must be complicated right? NOT SO!!!! VERY, VERY simple I promise. You buy the clear-ish plastic pony beads form the craft store, I just so happened to have some from my hair braiding days, or I’m sure you could use any clear plastic beads. You dump them into a round non-stick cake pan in a SINGLE layer, no greasing necessary (yes this made me nervous) and bake them in the oven on 400 for about 20 minutes. My oven took closer to 30 minutes, but it also depends on what kind of effect you want to have I suppose. The less time you cook them for the bumpier they are. I prefer them a little smoother so I kept checking them every 5 minutes after the 20 passed. As you can see, some melted differently. The clear ones still looked a little bumpy, but I was happy with it.
Baked and melty-looking
***NOTE, this does smell a little in the house so if you are bothered by melting plastic smells, I wouldn’t do this in your house. Maybe purchase a toaster oven that you could put outside?? I don’t know, but I know some people complain of the smell. It really didn’t bother me. I suppose if I was doing this as a full time job I would pick up an old oven and keep it in a shed or garage to bake in. But one time isn’t going to kill me. AND ANOTHER NOTE **** Just because I wasn’t sure how this was going to turn out, I went yard sale-ing for pans and paid .25 each. I didn’t want to use my own in case they got ruined, but I also don’t want to melt plastics in them and then cook food in them if you know what I mean. I’m not one of those nutty people who freak out over all things plastic, it just seemed weird to me, so I’m keeping separate pans for craft stuff.
So once the baked beads cool, flip the pan over and the plastic”cake” falls right out! No more worries about not greasing the pans. Woo-hoo!! I am so excited about this silly little NEW thing! Why didn’t I think of this?
After baking the first plastic cake, I was hooked. I got so many ideas! Now the original instructions said that you can drill holes in the sun catchers wherever you want them. Again this made me nervous thinking the plastic would easily crack, so on the first sun catcher I put a heart shaped metal cookie cutter [you can see in the picture above] at the top thinking I would make my own hole. The cookie cutter DID NOT pop out so easily. It was actually pretty well-stuck in there. I had to perform serious wiggling tactics to remove it. Finally it came out, so not too bad but I won’t try that again.
I thought I would make some smaller plastic cakes to hang as little dangles from my big one. So I took these muffin pans I also yard saled for a quarter each and put some beads in them ready to bake. This time I used a rivet for my holes (you can see the rivet in the pre-baking picture below) to see how this would come out, knowing I was going to leave them in as decoration. Now I didn’t realize that the cupcake pans were not completely non-stick coated like the cake pan was so I had to really pop the bottom of the cups to remove my cakes. I also noticed a “texture” on the bottom of the cakes from the pan and I could also see very tiny scratches. So note that any imperfections in the pans MAY be noticeable in your sun-catchers.
beads in muffin/ cupcake pans
So I now have one big sun-catcher, and 6 small ones. I imagined my sun-catcher with 3 long dangling strands each with 2 small ones on them. I realized that I have 6 circles with one hole each, and my big circle only had my top hole shaped like a heart. Oh boy. I HAD to break out my drill and proceeded to drill 3 holes in the bottom of the big sun catcher, and one hole in each of only 3 of the small ones. The ones hanging on the bottom of the strands only needed the top holes with the rivets. It really wasn’t that bad. No major cracking when I did the drilling. Next time I will not be worried to drill the holes later, but that won’t stop me from thinking of other creative ways of making cool shapes for holes.
NEXT STEP—I creeped into the shed —real sneaky-like—-and stole some of my hubby’s fishing line…..I couldn’t find any new packages, so I just took it right from the reel. HEHEHEEEEE, yes clever isn’t it? Fishing line is perfect for this project and if you have a hubby that likes to fish it’s probably something you have laying around the house—one less thing to buy, LOVE it!
tying fishing line in top and bottom holes
I tied all the pieces together exactly where I wanted them and VOILA!!! ***Tip- I dangled mine from the table so I could see exactly where I wanted to place them.
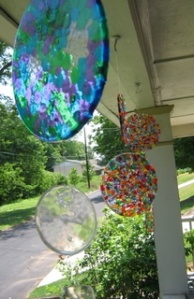
Hanging to see how they fall as I tied themoutsideThe whole shebangTrying to get pics in the sunlight…A semi-sunny pic….at least of the top half
So my picture-taking skills aren’t so great, but you get the picture (no pun intended). I love this new creation and I have so many ideas that come with it! I could make different shapes, I could put different non-clear items within them before baking, I could even make wind chimes. I can separate colors and make them one or a few certain colors each. I can make swirls or patterns with the beads before I bake them….It just goes to show how flexible some crafts are. No one says you HAVE to follow the directions to the “T.” I liked mine sun-catcher longer, I did that on purpose. You could make yours shorter, or put more small pieces on it. Have fun with it, make it your own. Send me pictures!!! I wanna see what you come up with!
Please visit me on Etsy and LIKE my page on Facebook to keep up with me!