I had a moment of weakness—or shall I say a few hours of PINTEREST inspiration!
Honestly I haven’t really been on Pinterest in months. With all my new listings in my Etsy shop this last week, I knew it was time to update my boards. WOWSA I felt like a Pinterest newbie all over again. You know– that time when you stayed up wicked late to pin everything you could possible think of and woke up the next morning with a Pinterest hangover? Well, not QUITE like that, but close. I just felt so inspired all over again, one of the amazing things I love about that site! I browsed through my old boards, searched around for some NEW stuff, and then of course — I got HUNGRY…yes hungry. Doesn’t Pinterest make you hungry? There is always someone pinning yummy treats!
I found a few good boards of recycled blue jean crafts and was in HEAVEN– yup I’m SINGING!!! I went pinning like CRAAAAAAAZY! So I’m sorry if you are one of my followers and you opened up Pinterest this morning covered with all my blue jean pins but I couldn’t help it! I feel like sewing with blue jeans today. Thanks Pinterest for the inspiration. 🙂
Tic Tac Toe with recycled blue jeans? HOW CUTE!!! I will definitely be making some of these!
If you’d like to see my Recycled Blue Jeans Board you can find it HERE — It is loaded with TONS of goodies!
As Always — Don’t forget to visit me on ETSY, SPRING SALE GOING ON!!! And LIKE my page on Facebook to keep up with all the goodies!!!! Remember to support your local crafters!
Oh wait, let me clarify, NO THIS IS NOT AN April Fool’s joke, it’s me…and YES I’m actually blogging today. And yup you read the title right. AND YES I’m serious! Let’s just get to the point so you understand my title. I’m not messing around. But I got your attention didn’t I? Cha-ching, score one for Heidi. 🙂
SEW— How the heck are ya? Me—I’m doing fairly well, chaos per usual. I don’t expect much less than chaos really, 4 children, trying to run a sewing business and now helping my hubby with his small engine repair shop….If you are a LOCAL and need your landscaping equipment fixed you will find his shop HERE — YUP it’s CRAZY busy! But I like it that way— If I’m not busy, I’m lazy.
My life has truly been a CLEVER CATASTROPHE this past year, and it has been quite some time since I have blogged. My how I have missed these keys! I thought it was about time I jumped in. No time like the present right?
So what have I been up to? I PUMPED out a bunch of KNOTTY dresses last summer, and hopped on the band wagon for a few craft shows just to get my feet WET. They came out SEW flipping cute!!
Knotty dresses
And here is my little girl sporting one I made JUST for her!
Say CHEESE Shelby!!!
The fabric on these dresses were so much fun. I used recycled blue jeans up on top for the bodices, fully lined with recycled t-shirts that I tie-dyed myself just for extra COOLNESS. 🙂 The lower fabric on Shelby’s dress was this AWESOME fabric I had in my stash for probably a year or two….it was SOOOOO pretty that I was afraid to cut it. I was also saving it for a selfish SEW (AKA, something for ME), but that never happened. With a craft show around the corner I decided to cut into it. Once I envisioned it as a dress it was a done deal. There is NO GOING back as a seamstress….once I picture clothing from fabric I have to go for it.
Sew, anyhoo. The knotty dresses are neat because the knots are tied and pulled through the buttonholes in lieu of using buttons. Some people may think this is a way of just being cheap, but it’s really KNOT. It’s a way of being more versatile for children. This dress will fit more sizes because you can adjust the height of the straps as your child grows.
In the boutique world, knotty dresses are very popular. Cape Cod craft shows, not so much. Everyone LOVES my work, but I don’t think they really get it. I didn’t sell ANY dresses at my local shows. I wasn’t disappointed. Ok, well maybe a little, but I know I was testing my market—and well my local market just IS NOT IT. Handmade children’s clothing definitely sells better online!
Blue Jean Pockets
These blue jean pockets were an easy sell. Whenever I recycle the blue jeans I kept throwing all the pockets in a box, especially the little ones with snaps and what not. My daughter came in my sewing room one day, picked one up and put her change in it. I said SHELBY you are a GENIUS! I added cool fabrics to the backs of them and turned them all into little change pockets! Or tooth fairy pillows for the tiny ones…
As for the other pockets? These pocket organizers are AWESOME! How resourceful is this for using up some pockets?
DISPLAYING MY GENIUS WORK
First craft show, I dressed up my daughter’s “life- sized” Barbie to model my clothing. I thought it was a cute idea at first….but honestly it was creepy. I mean still kinda cute, but definitely felt creepy…:)
By the way— This Barbie is not really life size…she is the height of a three year old….with the waist of LESS than a 2 year old….and the boobs of a 13 year old. Seriously. She doesn’t fit well into any of my clothing anyway….I had to pin it on her in weird ways…and it looks awkward because she’s really a teenager under it all.
So I designed my own little display model as seen in the photo on the right! I took two wooden dowels, left one long for the “body” cut one into three pieces for the “arms” and one for the middle cross bar “waist” one for the bottom cross bar. I won’t really call it feet….it’s really only to help center it across the bottom. If you want measurements, I don’t remember because I did this last summer and didn’t take notes— But I know the dowels were 1″ dowels and 4′ long. I may have even used 3 dowels? Just because of cutting that second one and needing three pieces.
I drilled small holes and then used screws to hold in the cross posts. The great thing about using screws is that I can twist the cross posts so that they all stand vertically for storage. This was an unplanned design that worked to my benefit.
Lastly on this cool design, I used PLASTER in the base. Just your normal everyday Plaster of Paris. Somewhere between 2-4 cups worth? Just enough to weight it down, but also to hold in the post.
I made two of these and they came out fabulous!
In the mean time, Please check out my shop! These Old Blues. I have more KNOTTY dresses that I would LOVE to see little girls dancing in– THEY ARE SEW CUTE! And CUTE skirts all on SALE this week just in time for SPRING. 🙂
Follow me on Facebook to keep up with my daily turn of events…:)
Anyhoo, I know my prices are set just right. I am comparable to other boutiques that sell handmade clothing. My quality is fabulous with professionally finished seams. I topstitch and serge just about everything, and I stand by my work. If someone is not happy, I keep working until I get it right. I impress myself sometimes 😉 toot-toot! Yes I just tooted my own horn. I love my work and I love what I do. I will just keep on truckin’ and building my business like I do! Maybe a few more shows this summer….we’ll see.
“MOM, YARD SALE!!!!” Well my kid’s started it this morning. It wasn’t me I swear.
I had a few errands to run. I had to pick up a t-shirt from another mom, and bring my Boy Scout to the dump first thing this morning (8AM to be exact) and I am NOT a morning person. I usually don’t make plans before 10am….too much work to wrangle up these kiddos, but this morning we HAD to. Every weekend the local scout troops and packs take turns sorting the returnable bottles and cans at the dump and in return they get a portion of the money.
So we decided to pudge around a little bit while the big kid was working with his Scout buddies. I went and picked up my shirt and we saw a few yard sale signs on the way there. *SIGH, I was bored and I couldn’t say NO!
So what kind of crafty finds can we find today???
I found this cute little sewing box, complete with a bunch of patterns and goodies for $5!
All the goodies inside!!! How perfect are these patterns? I love making kid’s clothing and these simple patterns suit my style—I can easily dress them up with ruffles. 🙂 I know I don’t NORMALLY use patterns, I usually draft my own but it’s always good to have something basic to start with. especially if I am trying a new design.
Found some great fabrics, cotton prints and some corduroy!!Cute little tray??? I love the tiles. I keep saying one day I’m gonna do some mosaicing….I even bought the tile grout.
The woman had $5 price tag on the tray and the fabrics were$3-4 each but this was a yard sale and most people are not firm on their prices. She told me to make her offers on the fabric so I offered $10 for the tray and the fabric….. she was fine with that. Woo-hoo!! I can’t wait to use that corduroy for something in the fall!
I know this shirt is wayyyyyy too big for me. But it’s a gorgeous color, and it’s NEW! I think I paid a quarter for it and it still has the extra button attached. I am already envisioning this refashion!
Any crafty finds for you today? Did you stop at any yard sales? It is a great day on the Cape for it!
More upcycles! I know…am I killing you with my upcycle posts or are you loving it?? But come on— This is like my 4th post this week right?! That’s an accomplishment!
Sewwwwww, anyhoo, I finally finished my sew along piece for the Renegade Seamstress’ Refashion Runway! This weeks challenge was : DENIM. Um hello<<<<< THAT”S MY THING! Right? I mean my business is “These Old Blues.”
So I have to tell you first that when I saw the challenge this week was Denim, I just about flipped. As you can see above that I’m ultra excited about it! My first thought was a CORSET. I have been DYING to make a denim corset. I know people say you shouldn’t make one from denim, the fabric is too heavy, and it tends to have too much stretch. I don’t care though. I want a blue jean corset!
I started the pattern work….Now I’ve NEVER made a corset from scratch. I have upcycled other corsets but never done this whole entire process. So I’m teaching myself how to do this and realizing this is pretty hefty project. I will not be able to do a great job on this if I rush it and try to finish it in a week. So once again my corset is on the back burner—but it is in progress! I have the pattern in my muslin so I can try it out and make adjustments before cutting into the denim. I promise I will share with you all when I have it completed. 🙂
On to the project for the Refashion Runway Sew Along. I was doing laundry and thinking about what I could do that would really show off my talents. I was overwhelmed with the possibilities. As I’m folding clothes I came across this piece:
So this cute little denim jumper was getting a bit too small. My peanut is finally growing!
This is an 18-24 month jumper that fits more like a 12 month outfit. Shelby is 2 remember?? Well most of her stuff is about 18-24m anyway because she’s tiny, but she is FINALLY starting to sprout. The last time she wore this little number, every time she moved the dress hiked up and I could see her diaper hanging out. The dress still fit her width-wise, so I imagined just adding a ruffle to it.
I’ve also been imagining an awesome 4th of July outfit for her—-and then it hit me!
OOPS! Yup I cut it in half! I was sensing that it was time for an upcycle…or “Refashion”
I cut the dress in half and decided to make a 2 piece outfit. I’ve been dreaming about stars and stripes with chevron for months now. So first I handpainted stars all over the denim top and bottom. Then added red and white chevron to both the top and bottom. Then a blue patriotic ruffled edge to the top and more blue ruffle on the bum of the skirt. I also upcycled a pair of red shorts to go under the cute little skirt. For those little bend over moments. 😉
I tried to get a close up of her cute little bow….she wasn’t happy at this point. She even pouted and told me no. I snapped the picture anyway. LOL. She really just wanted to spin around and play, but I was trying to snap pictures quickly before it started to rain again! Sorry sweetie! She IS getting better at this posing thing though.
The bow was NOT handmade by me. I purchased it from Princess Izzy Boutique on Facebook. SHE HAS FABULOUS ACCESSORIES, and is VERY reasonably priced!!! She is also on Etsy and you can find her shop HERE.
Excited! She really loves it!!!
As Always — Don’t forget to visit me on ETSY, and LIKE my page on Facebook to keep up with all the goodies!!!!
Still coming up soon is my Purse Renew Tutorial! It’s in progress peeps!
Here is the second part of my post from yesterday. If you didn’t catch part 1 you can find it HERE.
These are my most recent upcycles from another Designer’s Day event. These are all handmade by ME.
This was another $1 giveaway!!! A pair of white jeans turned into this cute little ruffle skirt!I Love gymnastics tee turned into a sundress!Hearts and Palm trees! The design on the shirt is very glittery and this skirt fabric has silver hearts all over it. Lots of twirl!Itty-Bitty Patriots fan!!! This was a tiny Pats onesie that I turned into a mini-cheerleader dress. This is to-die-for!!Another fabulous upcycle for the Boston Red Sox fan!With extra ruffles on the back.4th of July!!! Cute, summery, and ruffled up!
Thanks for viewing my upcycles!
As Always — Don’t forget to visit me on ETSY, and LIKE my page on Facebook to keep up with all the goodies!!!! Any of the above items that DID NOT sell are listed in my shop.
So here is a post that I promised! Some of you have seen my work, but I always forget to share my business with my blog followers. I have been working really hard this week to direct my blog more toward my business. After all, the reason I began blogging was to find another avenue to network with people who are interested in what I do. Blogging is another way to share and promote my business.
I love to upcycle everything. I love to recycle old blue jeans, t-shirts, and more. Sometimes I buy new t-shirts if they are clearance and OH SO CUTE, but I try to use as much as I can from thrift tees and donated tees. Some people are picky about using thrift tees but the beginning of upcycling started when people began using clothing that no longer fit their children to make “new” clothing. So my philosophy is that “upcycling” should be exactly that—-it is taking something that is partially unusable and creating something new with it that serves a purpose. I have a few bags of clothing and miscellaneous items that have been donated to me for upcycling. I will find something to do with anything! Yes, this is half the reason that I have sooooo much stuff. It is extremely difficult to throw thing s away when you have so many useful ideas for them.!
Anyhoo—on to the goodies.
This is another post that is going to be full of pictures! I won’t need to explain much!
In March, and in June, I participated in a “Designer’s Day” in one of my Facebook groups : Upcycles Galore. This is a group for upcycle re-sells, but every few months they like to host a big day for designers to show off their work, and make some sales. It’s a big fun day with lots of goodies, auctions, $1 giveaways, designer deals, accessories, and more! It is a closed group so you have to join to be able to see what goes on over there. whether you are new to upcycles or a seasoned fan, the group is a ton of fun for everyone.
Here are the goodies I listed:
Blue jeans to skirt upcycle. Ruffles from old tee shirts!“Franken-Stitched” punk upcycled black jeans and new cotton prints.Up close—This is “Franken-stitching” 🙂 *** a bunch of pieces of denim sewn together like a crazy quilt and turned into a big piece of fabric.A pair of overalls recycled and turned into a dress!!!The overalls with matching ruffle pants!!Upcycled blue jeans dress and ruffle jeans!Love this Pac-Man shirt!!! Cut and shaped then added sleeves and ruffles to make a cute dress!This was a $1 giveaway! A pair of jeans upcycled to a cute ruffle skirt.I listed this as a custom spot. I had three tees and planned these fabrics to use with them.
These are the custom dresses I created with the Horse tees and fabrics. Wicked cute!!!
Ruffles up close!
So I don’t want to bore you like crazy so I am splitting this post up into 2 and sharing my items from the next Designer day on the next post!
As Always — Don’t forget to visit me on ETSY, and LIKE my page on Facebook to keep up with all the goodies!!!! Any of the above items that DID NOT sell are listed in my shop. 🙂
Things are slammin’ busy around here but somehow I’m managing to get I some sewing time—-and sewing for myself! How does that happen?? JUST SQUEEEEEEEZING in a few minutes here in there…..Like the fact that I’m throwing together this post before dinner?
Anyhoo, if you haven’t checked out Refashion Runway on The Renegade Seamstress you can find week 1 HERE. I am NOT a competitor, but I’m giving it a try the next time around, so for now I’m sewing along!
The first weeks challenge was :STRIPES
Oh stripes how I love thee!!!
So this is what I picked up from my local thrift shop:
Too big of course! But I loved the BIG stripes—-I KNEW right away what this would turn into!Hello frumpy top! Yes again WAYYY too big! BUT I loved the color and the mini stripes.As soon as I found this I was like WHOAAAA! It’s a Banana Republic dress—-oh sooooo soft and slinky—-but too small—-and not so forgiving around the middle.
I did pick up a few more fun items for some other refashions. But I’ll save those for another time. 🙂 I never make enough clothes for myself so this is a goal of mine now. I’m overwhelmed with clothes that don’t fit and it’s time to refashion them!
So this is what I made—-yes it’s actually 2 refashions! Here is the first.
Woo-hoo! LOVE this tank! I feel ready for summer!
I cut the shirt down to fit my size, scooped out the neckline, and then cut a few of the navy stripes to use for the arm and neck binding. Its sooo comfy!!!
So then I took the dress and cut off the entire top part from the arms up. I placed the “dress” over a pair of yoga pants to get the right fit.
I cut up the tank to make my waist band, and measured how much I would need to finish the top half of my skirt. The diagonal band was a last minute idea when I discovered a small hole in the side seam of the dress. Of course I could have just repaired the seam, but this looks SEW much better don’t ya think?
I LOVE THIS SKIRT!!!!!!! I used the mini striped tank and that fabulous (not so well fitting) dress. I know that stripes are generally NOT very forgiving on the hips. YES, they may make me look a TAD bit wider, but in reality the cut of this skirt slims back in around my knees and gives more of an hourglass shape/ mermaid style. I really love it more than I thought I would!
Next weeks challenge: Denim! <<<<Lucky gal this one is! This is MY challenge! wahahahaha!
Are you sewing along???
PS: Please forgive the pics of me in the mirror—-I have not yet figured out how to model my own clothes! My kids are not very good at snapping pictures yet! Another challenge on the way for me….:)
As Always — Don’t forget to visit me on ETSY, and LIKE my page on Facebook to keep up with all the goodies!!!!
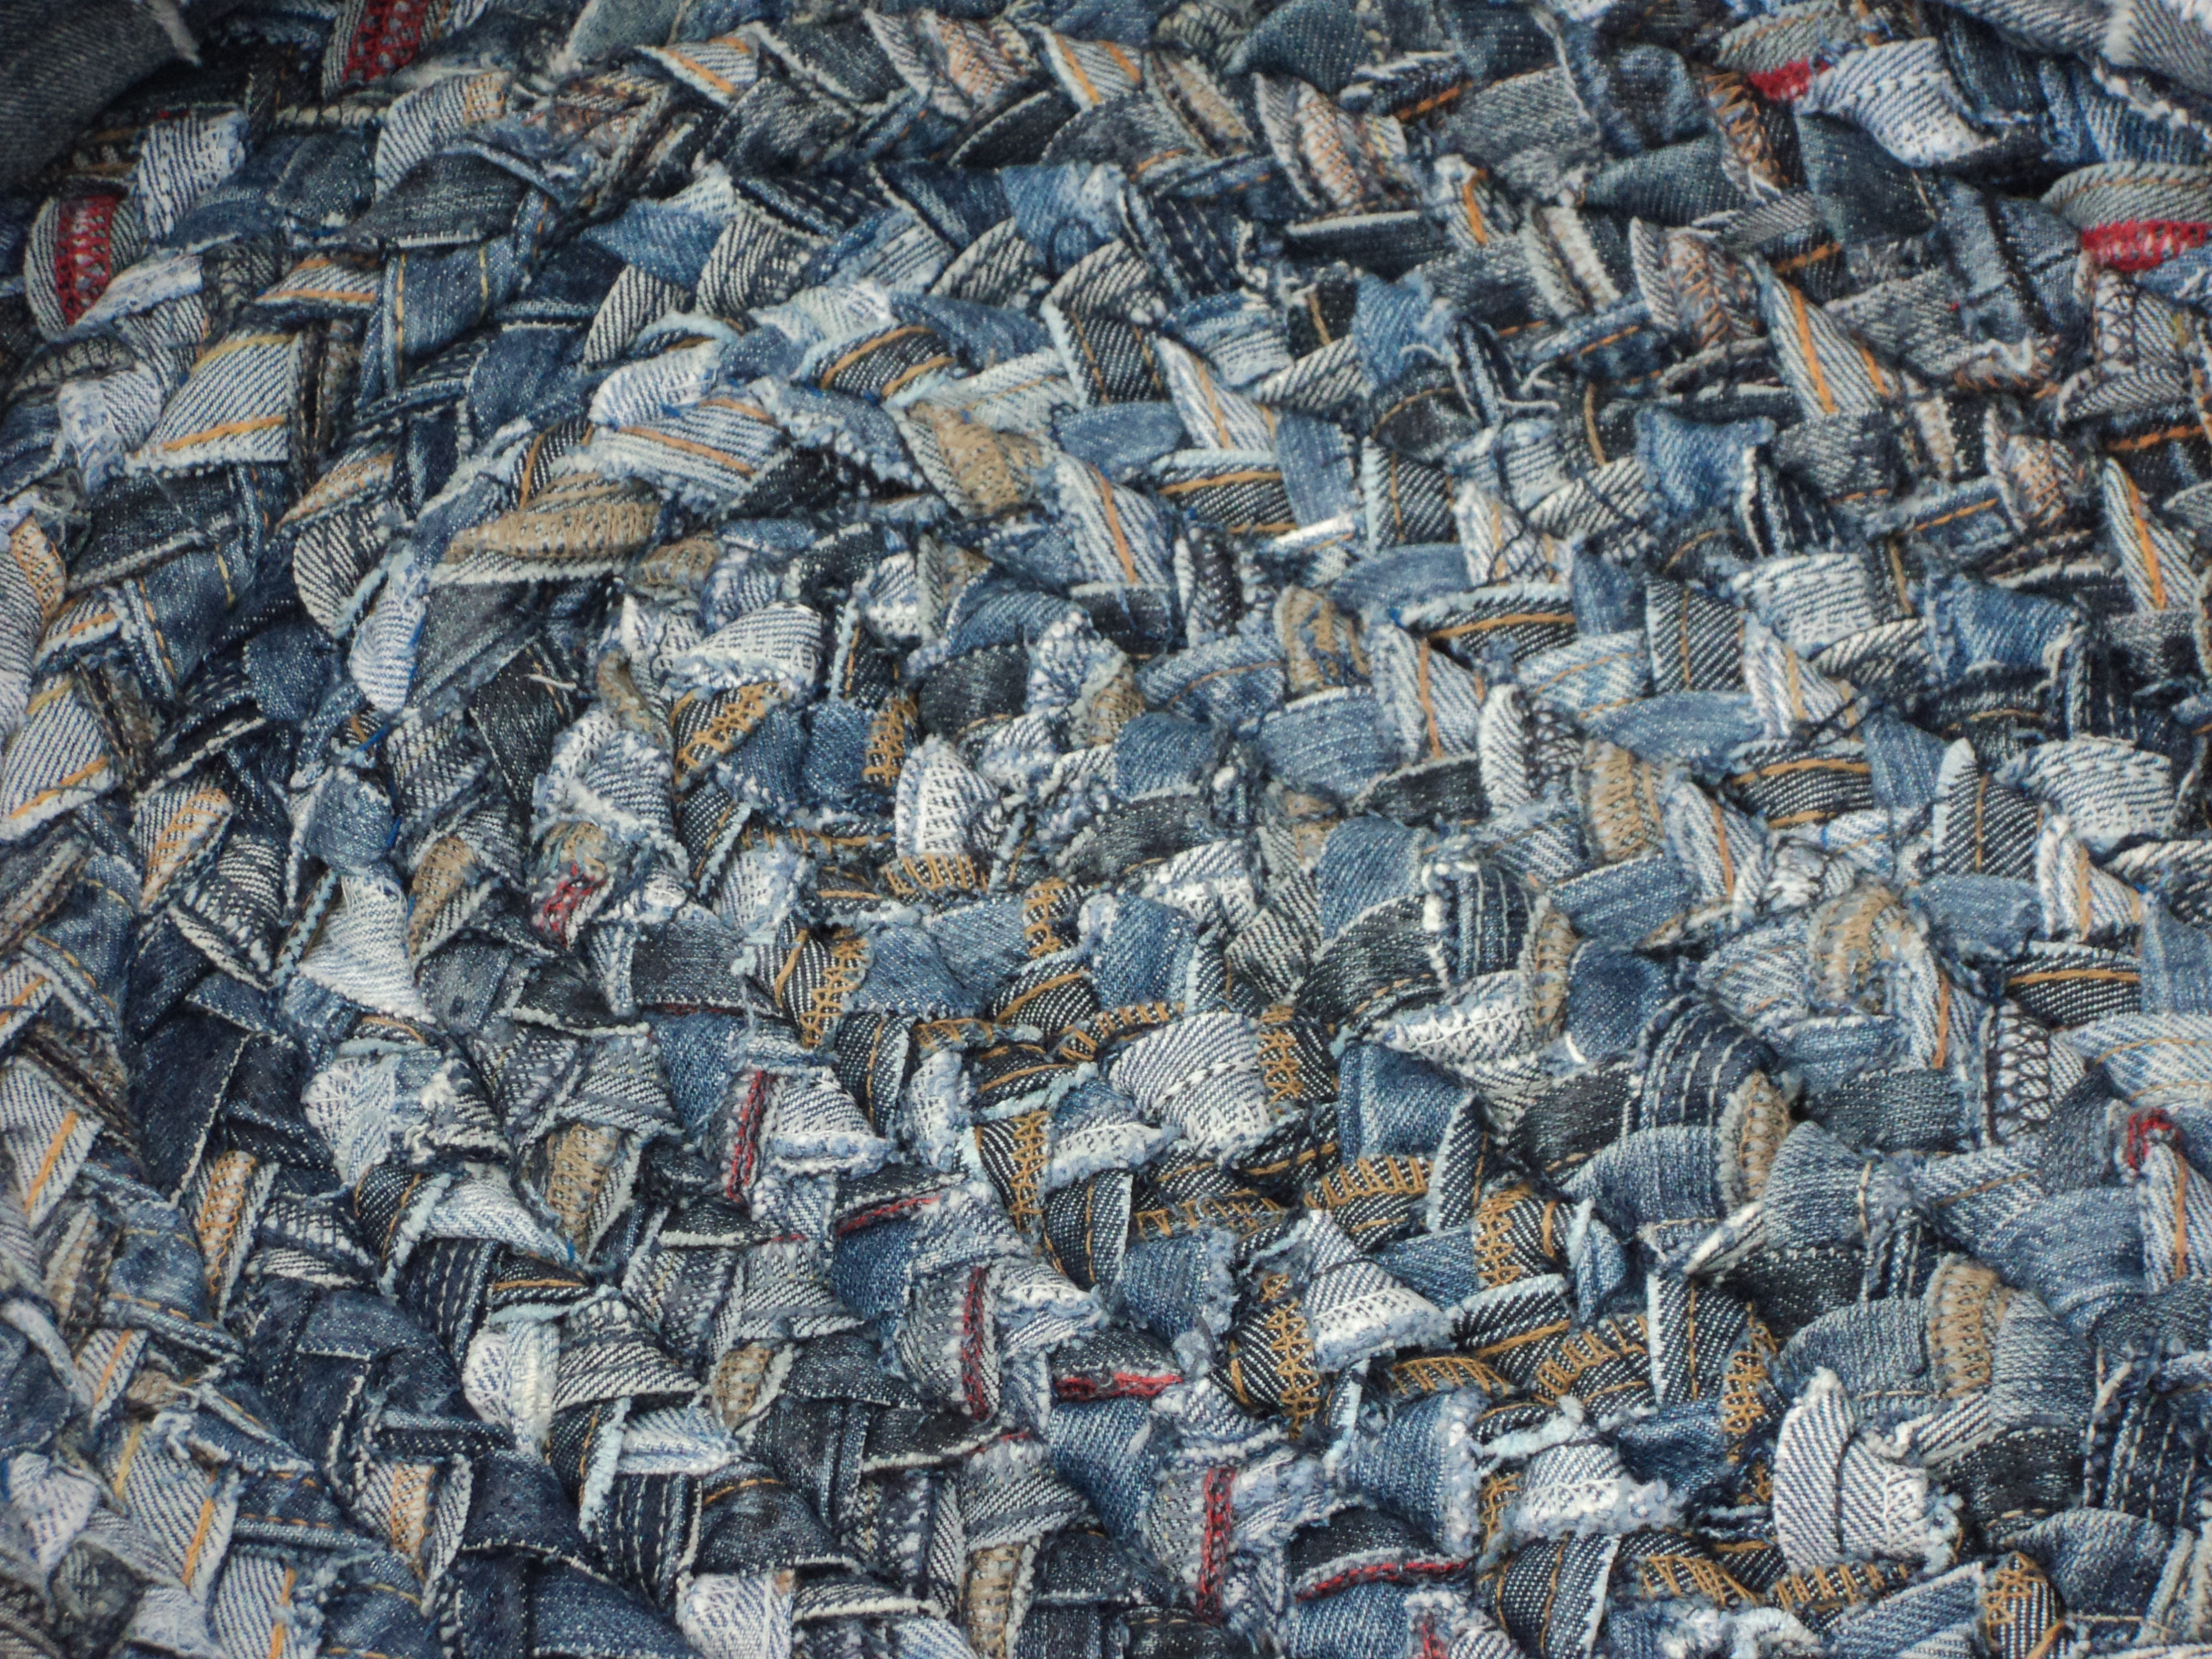
So here it is, I promised to show you how I made this cool basket!
This is not a simple task, but it’s not overly complicated either. It is a LOT of work with many little steps – so this is a LONG post. Pay close attention, and if I missed something, don’t be afraid to ask! I searched everywhere all over Pinterest, google, and Etsy, and NO ONE is making baskets like this! So this was my first and only attempt (so far) at basket making.
Lets start with materials.
You can always size this down for a different sized basket. I am considering making more in different sizes and shapes.
***Sorry I don’t have exact measurements of these items—I don’t work that way generally. I’m just a fly by the seat of my pants kinda gal. I did try to take pics for the blog but I didn’t think to measure the dowels, the zip ties, or the blue jean sections. I like to make most of my stuff flexible so sizes can be easily adjusted. Sewing is a completely different story so we won’t go there!
I started with 4-5 pairs of jeans
A good heavy duty pair of scissors for the jeans
6 or so large heavy duty/ industrial sized zip ties (*My hubby used to do A/C work and this is where I got these!)
clamps, clips, or clothespins
heavy glue that will bond plastic—I used 527 in this pic, but I ended up switching to Amazing Goop which holds plastics much better!
Pliers/ cutters for cutting the zip ties
Wooden dowels for side supports
needle and thread for hand stitching
Some quilt batting for cushioning the handle
I had the idea that I was going to make a basket, a rather large basket, and I wasn’t sure if I was going to weave it or braid it. I had started a braided rug-like thing a while back with blue jean strips, and I thought this would make a great bottom for the basket. The rug was taking FOREVER, so it was sitting in my to-do bag anyway and I’m glad to get rid of it!
First I began by cutting the buckle end off of the zip ties. I knew I would be using the plastic bands for the bottom support, the top support, and the handles. Just FYI, it took two bands each for the bottom and top circumferences of the basket. Do not glue them yet!
Second I began by cutting the legs off the jeans to get as much of the length as possible. I threw the top half of the jeans in a basket of jean scrap stuff that I will use later for another project. I don’t throw ANY part of the jeans away.
Then I cut one of the side seams open. This picture below was after cutting one seam so the pant leg is open. I cut the side seam out on the left, then the seam in the middle so that I was left with 2 strips of denim fabric with no seams.
I was planning on cutting the bottom seam off the leg as well when I noticed that the seam was about the same width as my zip ties. So I threaded the zip tie through the bottom edge of the denim seam! It fit! I was super excited that I could leave part of the original blue jean look!
How awesome is that?
Anhooo, moving on.
Planning on using this edge for the bottom of the basket—-Why not?—-I cut all the denim pieces about 10 inches up from the bottom leg seam. (SET THE LARGER PIECES ASIDE, you will need these later!) I knew I wanted the basket to measure about 8-9 inches tall and I needed the extra inch or so for the top seam too. So the 10″ pieces with the bottom hem you will be using now for the bottom of the basket. I began threading these blue jeans strips onto the zip tie until it was full. I added a second zip tie, I overlapped the open edges of the zip ties through one of the seams. The seams were tight enough with 2 bands going through it that I did not have to pre glue them but I did add a drop or two of glue on them before sliding them together just for added support later. Once I had the diameter I wanted for the bottom of the basket I overlapped the two open edges of the zip ties (another drop of glue) and threaded them together inside one of the seams again. This should form a circle or oval depending on what size basket you are making.
Almost finished the oval!
I pre glued two of the plastic bands to begin the top edge of the basket. Leave one side open because you will need to thread the top edge through. These bands are so thick that they will NOT just glue together, you have to clamp them and walk away for at least 2 hours. The MFR recommends 24 hours for complete bonding, but it will be mostly dry after 2 hours.
Next I cut the denim at 1″ intervals. Actually I snipped a starter piece at the edge and then proceeded to rip the denim lengthwise on the grain. Denim will tear into perfect strips very easily if you cut it lengthwise. 🙂 The tearing automatically stops when you get to the bottom seam. Perfect!
If you don’t have the image going in your head of how this is going to turn out, it should start taking the basic form now. These strips of fabric are going to be the vertical pieces of your weaving.
Next fold each strip down along the top edge about an inch(wrong side inside the basket) so that you will form a tunnel at the top for the plastic band. Machine stitch 1/4″ away from the open edge of the jeans. ******I know this sounds confusing and I don’t know how to explain it better—-It is just like hemming the pants but you are leaving enough of a hem that the plastic band will fit through the top edge just as you did for the bottom. Check out the picture below to see if this helps!
Here I pre-pinned where I wanted my stitching. I folded the jeans over the edge of the plastic band so I knew how deep my seam needed to be. I took the plastic band out and then stitched the seams. I used a “chain piecing” technique, often seen in quilting, to get through the seams fast enough. This means I did NOT snip the threads in between each strip of denim, I just continued stitching onto the next piece as though it was one piece of fabric.
After all the stitching is complete, then go back and snip the threads in between the strips (if you want to—you may be fine to leave them stitched together).
Now insert the plastic band around the top edge of your basket. Overlap the edges of the band once you have the desired size you want. By this I mean—-Depending on your basket shape, mine is an oval and I chose for the top edge to be wider than the base. You may choose to have it the exact same size. It’s all about personal preference. 🙂
Place a little bit of glue on the plastic bands before you overlap them and make sure they are covered inside your seam. You may have to clamp the bands again and allow to dry if your bands are not sticking together.
And now you can really see the basket taking shape!
Woo-Hoo!
Now add side supports. Cut wooden dowels (about 1/4″ or 3/8″ diameter?) into 9 inch sections or whatever the depth of your basket is. You need about 8 supports. Place them vertically along a strip of denim, evenly around the inside of the basket and stitch them by hand into the strips. Again I forgot to take a picture, but you are just whip stitching around the dowel, and through the denim, over and over from one end to the other. Now you can really see the basket coming together.
Next you are going to go back to the big pieces of denim.
With your scissors snip just a tiny bit of the edges at one inch intervals; approximately—a little size difference won’t matter, in fact it adds character, so don’t bother measuring! Then grab the two pieces and RIIIIIIIIPPPPP! Down the length of the jeans, just as you did for the smaller pieces. My husband actually said OOOO that’s cool, let me try, I wanna help!<<<<Something about guys and ripping fabric, LOL.>>>>> So I had a big helper to rip my denim into strips. I used all of the pieces from those 4-5 pairs of jeans. I ended up with a big pile of strips., but I forgot to take a picture. 😦 Sorry— there are a few places I am missing pictures!!!
I took my denim strips to my sewing machine and stitched them end to end in random order. I made each longer strip about 3 pieces long in order to make my pieces that would be the horizontal strips of my basket. The three strip length was long enough to go around my basket with a little bit leftover.
Now to begin the weaving process—-the FUN part! I placed one strip along the bottom edge of my basket, leaving out about 4″ or so hanging out, I began weaving the rest in and out of the vertical strips already in place. When I got around to the beginning again I decided to knot the ends together, and I rather liked the tied look of it. I was originally going to stitch the ends together by hand, but this came out so much prettier. Gosh I love it when things just happen!
Here are the tied ends in the picture below. I decided to stagger each row as I began so that the knotted pieces each started one more row over for a pretty effect.
Detail of ties up close! ***and my label of course. 🙂
Once all the rows were completed I was kinda stumped on the top edge. I could see some of the plastic bands in between the strips of fabric, YUCK. So I took some leftover strips and braided them—–with each turn of the braid I took one strip and wrapped it through the edge of the basket so I covered those ugly plastic strips poking through.
Now the basket has a beautiful braided edge all the way around the top. <<<And I think I just tied this one on the ends as well!
OK, for the bottom of the basket.
Here I used all my leftover “seams.” I have a box of seams from all the jeans I have recycled. You can use other strips if you don’t collect like I do. I sew these together end to end and then braid them together. Then I sew the braids together by hand in a round or oval fashion, like a braided rug. When I did this the middle of the “rug” puckered a little so I had to steam and press the finished mini-rug with my iron. I used a little bit of homemade spray starch (water and a few TBLS of cornstarch) to get the fabric to stiffen a little and maintain it’s shape once I pressed it flat.
How cool is that? Hubby says, you should make a rug like that. I’m like really? No DUH, lol that was my original intent….but it takes SOOOOOOOOOO long and I only have a piece the size of a large basket….
After I was satisfied with the size and shape of the bottom of my basket I flipped the basket over and whip stitched it into place along the bottom edge of the jeans.
Ok, lastly, the handle! Ahhhh, I bet you can’t wait to be done with this project—-I know I was by this point!
I took four blue jean strips, about 8 inches long each (by 1- 1/2″ wide) folded them in half and stitched along each edge, leaving a strip in the middle that formed a pocket about 4 inches long now. I took two of the plastic bands. placed a little bit of glue on each end, and slid the bands into each blue jean pocket. You should now have two plastic bands that have each end covered with blue jean strips. You will be using these “pockets” to stitch your handles down. These pockets ensure that the handle will not just fall out when you lift your basket by the handle.
I cut a two inch wide strip of quilters batting and wrapped it around the plastic band. Then I took my leftover LONG blue jean strips and wrapped them around the batting covered bands for a nice cushioned handle. I hand stitched the strips at each end of the handle. I made two of these handles and criss-crossed them as seen in the finished picture here:
Upcycled Blue Jean basket!
You can see in the picture how I placed the handles. It actually doesn’t show the cross at the top but oh-well you get the idea? I placed the ends of the handles through the weaving and hand stitched them into place.
Finished! Viola!
This is a OOAK basket—-If I make anymore they will be different I’m sure. I would love to make some smaller ones for fruit bowls in the kitchen, or decorations around the house. The plastic bands do not offer enough support for carrying laundry or anything, so I wouldn’t recommend this for anything other than decoration. I actually thought it would be a cute PHOTO PROP for a newborn baby……for all you photographers out there. 🙂
There is this AWESOME Easter Basket giveaway going on right now from Kelly Cronin Photography. Head on over to her FaceBook page now to find out more details on how to enter! BUT YOU MUST HURRY!!! THIS ENDS IN JUST 2 DAYS!!!
So WHY am I telling you about a giveaway on another page????
Well that’s because These Old Blues (that’s ME!) designed and created the incredible basket for the giveaway. The basket is made from recycled blue jeans!
Upcycled Blue Jean basket!Detail of ties up close! ***and my label of course. 🙂
Do you notice the bottom edge of the basket? Check again, does it look familiar??? Check the hem on your jeans now….Did I make you look down at your jeans? Great, mission accomplished! Go ahead and let me know that I MADE YOU LOOK!
This is the inside/ bottom, of the basket.
I’m going to WARN you that the basket is rather LARGE, so I believe you may have to be a local Cape Codder in order to pick up your winnings. Once again, Please check out Kelly’s Page for more details and the link to enter. Please hurry!!! The giveaway ends on March 20th!!!
One person at random will win a gift basket full of goodies! What is in the basket?
Kelly Cronin Photography :: $100 Gift Certificate Oasis Salon & Spa :: Gift Certificate Beach Way Sweets Shop :: Gift Certificate & Chocolate Bark Cape K9 & Chatham Dog Club :: 2 Free Dog Training Sessions, 2 Free Dog Daycare Sessions & product Pink Zebra Sprinkles & Stripes with Tiffany Jester :: Glimmer Candle Kit & 2 Jars of Sprinkles Cape Cod Mommies :: Wooden Toy by Toy Maker Lester Ruth Hooked Couture :: Gift Certificate Sweet Bean :: Kitchen Aid Mixer & Gift Certificate CapeCakes by Kristen :: $25 Gift Certificate & 1/2 Dozen Cake Pops These Old Blues :: Blue Jeans Basket Lia Sophia with Jilanne Silvester :: Jewelry Forever Knot :: Barrette Salon Fabulous :: Gift Certificate & Product Goodies of Chatham :: 2 Pairs of Snuggle Socks, Chatham Life is Good Mug, Life is Good Magnet & Stickers Summer Sitters :: One Evening (4hrs) Babysitting (up to 3 kids) Please contact each business with questions/restrictions or more info on the products/gift certificates they are offering. Sign up here for a chance to win! Plus, if you get 3 friends to sign up, you’ll have a chance to win a secret prize!!
Picture from Kelly Cronin Photography’s FB page includes logos of local businesses included in the giveaway.